Getting Started
Node.js and Npm
JumboJS is built upon Node.js so you need
Node.js in version
8.10.x or higher and its
package
manager npm.
Node.js® is a JavaScript runtime built on Chrome's V8 JavaScript engine.
Node.js uses an event-driven, non-blocking I/O model that makes it lightweight and efficient.
Node.js' package ecosystem, npm, is the largest ecosystem of open source libraries in the world.
(taken from nodejs.org)
Installation
The best way how to start with JumboJS is to install
jumbo-developer
package and use it to create new project.
So first install jumbo-developer via npm
npm install jumbo-developer -g.
Now you can create your first project. Enable jumbo-developer, type
jumbo-developer to console/terminal and developer tool will start.
First you must specify your project location, it'll do nothing, it just save your location and all
future actions will be processed over that location.
Then you should finally create your project. Type create project,
and
your first project is going to be created in directory you specified in previous step.
Now you should run your application. Go to your project directory and run it via
npm start. Your application should run on address
http://127.0.0.1 on port 30000. If you want to change default port, edit app.js file,
and change parameter of runWhenReady(port, ...).
If you want to use framework's subdomains, you should edit your local hosts file and add
some domain for your application.
Project Structure
- adapters
- app
- controllers
- facades
- models
- services
- sub-apps
- Example
- controllers
- models
- ...
- templates
- bootstrap
- data
- errors
- logs
- uploads
- public
- images
- scripts
- styles
- temp
- cache
- session
- app.js
- config.js
Autoloaded Namespaces
In JumboJS there is no need to use requires/imports with complicated relative paths (require-hell).
Yes, you must require Node.js modules or your custom 3rd party stuff but framework classes
are autoloaded to global namespaces.
There are global Objects Jumbo and App.
These Objects contain all classes from framework which are autoloaded when you start app.
These Objects create namespaces and structure of namespaces is copied from folder structure.
Namespace Jumbo point to framework core.
Namespace App points to folder /app/.
Eg. /app/controllers/HomeController.js file is accessible via
App.Controllers.HomeController.
Classes in namespaces are defined as getters and are required just in time so global namespaces are
lazy, same as calling require().
Inside getters there is require() call so after first get it's cached thanks to require cache.
Configuration
For basic configuration there is file /config.js. It's JS file so you can use IDE's completition.
And you can add custom properties into config object too. This config is globally readonly
accessible
via Jumbo.config.
Default Config File
config.js
const $cfg = require("jumbo-core/config-options").Configurations;
const $umjs = require("unimapperjs");
const MySqlAdapter = require("unimapperjs/adapters/MySqlAdapter");

/**
 * @name ApplicationConfig
 */
const applicationConfig = {
	/**
	 * Used for styles of Error reporting
	 * In development mode Errors will be shown in browser (browser errors not implemented yet) and in console
	 * In production mode Errors will be logged just to file if log enabled
	 */
	deployment: $cfg.Deployment.Development,

	/**
	 * For debuging; disable clustering and run app in one debugable process
	 */
	// debugMode: false,

	/**
	 * Protocol setting
	 * If you set HTTPS protocol specify privateKey and certificate paths
	 */
	protocol: {
		/**
		 * @default Http
		 */
		protocol: $cfg.Protocols.Http,

		/**
		 * Private key path
		 */
		privateKey: "data/private.key",

		/**
		 * Certificate path
		 */
		certificate: "data/certificate.crt",

		/**
		 * Or just PFX archive certificate
		 */
		pfx: "",

		/**
		 * Certifice passphrase
		 */
		passphrase: null
	},

	/**
	 * Multi-core support
	 */
	clustering: {
		/**
		 * 0 for automatic clustering driven by number of CPU's cores
		 * @default 0
		 */
		numberOfWorkers: 0
	},

	/**
	 * Enable template cache and define memory limit
	 */
	cache: {
		/**
		 * @default true
		 */
		enabled: true,

		/**
		 * Size limit for templates saved in memory
		 * JumboJS store often used templates in memory
		 * @default 10 MB
		 */
		memoryCacheSizeLimit: 10e6
	},

	/**
	 * Session configuration
	 */
	session: {
		/**
		 * Name of cookie which stores users's session ID
		 */
		sessionsCookieName: "JUMBOSESID",

		/**
		 * Length of session's life in days. It'll be deleted from disk after that time
		 * @type {Number} Number of days
		 * @default 30
		 */
		sessionLifetime: 30,

		/**
		 * Limit size of data saved in memory
		 * Not implemented yet
		 */
		memorySizeLimit: 20e6,

		/**
		 * Disable sessions saving to disk - speed boost
		 * When true, memorySizeLimit is ignored
		 * @default false
		 */
		justInMemory: false,
	},

	/**
	 * Enable log and set log level
	 */
	log: {
		/**
		 * @default true
		 */
		enabled: true,

		/**
		 * @default Warning
		 */
		level: $cfg.LogLevels.Warning
	},

	/**
	 * Maximal allowed number of requests per second. You can limit server stress.
	 * If more than specified request count will come, new requests in rest of one second obtain 429 code.
	 * Static files are counted into this number of requests
	 * @default null
	 * @type { Number || null }
	 */
	maxRequestPerSecond: null,

	/**
	 * Enable prevention of (D)DOS attacks
	 * It internally enable requests monitoring which will count number of requests per IP
	 * If IP makes more request per second new requests from that IP will be refused with code 403.
	 * Requests will be still accepted by server but framework will refuse to continue and save resources which
	 * proccessing of that request can framework take.
	 */
	DOSPrevention: {
		/**
		 * @default false
		 */
		enabled: false,

		/**
		 * The limit of request per second from same IP
		 * @description Warn! If you use framework static server and your index page have
		 * more than 100 links (scripts, styles, images etc.) client will be blocked!
		 * @default 100
		 */
		maxRequestPerIP: 100,

		/**
		 * Duration of IP blocking [in seconds]
		 * @default 3600
		 */
		blockTime: 3600
	},

	/**
	 * Allows you to use more languages (defined in URL right after first slash; eg. domain.tld/en-us/page/article/1)
	 */
	globalization: {
		/**
		 * Allow using languages
		 */
		enabled: true
	},

	/**
	 * Maximal size of POST data
	 * @default 5 MB
	 */
	maxPostDataSize: 5e6,

	/**
	 * Object with domains
	 */
	domains: {
		"default": $umjs.createDomain(MySqlAdapter, {
			host: "localhost",
			user: "test",
			password: "test",
			database: "node-task-manager"
		})
	}

	// You can define your own settings here,.. it'll be available via global Jumbo.config
};

module.exports = applicationConfig;
You can remove all properties with default values, this config extends the framework one with
default values.
Handlers
Handlers are proprties in framework's classes which allow you to change some behavior.
It's next level of configuration.
* : Jumbo.Application.Application.setBlockIpListener(listener: blockIpListener)
Instance method
You can handle IP blocking when IP / request / sec limit reached. You can block this IP in
firewall or you can do whatever you want.
callback
blockIpListener(blockedIP)
Params
* : Jumbo.Application.setStaticFileResolver(handler: staticFileResolver)
instance method
You can handle requests for static files on your own.
handler
staticFileResolver(fileName: string, callback: staticFileResolverCallback)
Params
- fileName : String Full file path, resolved
- callback : staticFileResolverCallback Handler callback
callback
staticFileResolverCallback(error: Error, readStream: fs.ReadStream, mime: string, size:
number, headers?: { [key: string]: any })
Params
- error : Error Error
- readStream : fs.ReadStream File read stream of given static file
- mime : String Expiration in seconds
- size : Number size of given static file
- optional headers : { [key: string]: any } Optional response
headers
* : Jumbo.Application.Application.setTemplateAdapter(adapter: ITemplateAdapter)
Instance method
Set template adapter for view rendering.
Jumbo.Loger.Log.logFunction
: logFunctionHandler
Static field
You can change the default logging and store log messages on your own.
callback
logFunctionHandler(message, type)
Params
- message : String
- type : String
Default application script
app.js
/**
 * Application initial script
 */

// Get application from jumbo-core
let application = require("jumbo-core").application;

// Call route config for registering locations
require("./bootstrap/locator-config")(application.getLocator());

// Call DI registrar
require("./bootstrap/di-registrar")(application.getDIContainer());

// Register template adater - not needed if you want to use default adapter
// application.setTemplateAdapter(Jumbo.Adapters.TemplateAdapter);

// Register application for run at port 80; It'll run after framework do all async jobs
application.runWhenReady(80, function() {
	// You can do something after start
});
Routing
JumboJS has advanced routing system (called Locator) which allows you to define
powerful dynamic routes (locations).
In base project there is file /bootstrap/locator-config.js where locations are registered.
See API: Application: Locator for more information.
Locator config
/bootstrap/locator-config.js
/**
 * Locator configuration - setting host, sub-domains and locations
 * @param {Locator} locator
 */
module.exports = function(locator) {
	const types = locator.constructor.ParamType;

	/*
	 * DOMAINS
	 **************************************************************************************************/
	// Default sub-domain which will route to base app;
	// both urls with and without www will work
	locator.setMainSubdomain("www");

	// Create admin.yourdomain.tld which will route to /app/sub-apps/admin folder
	locator.addSubdomain("admin");


	/*
	 * LOCATIONS
	 **************************************************************************************************/
	// Allows you to change url delimiter from "/" to whatever you want
	// In this case "-" gonna be used, eg. /controllerexample-actionname-foo?bar=5&baz=0
	// But you still define locations with "/"
	locator.setDelimiter("-");

	// example; rewrite action name; limit id with RegExp
	locator.addLocation("locationName", "$controller/delete/$id", {
		"action": "deleteEntity", // no $action in location, so "deleteEntity" gonna be used
		"$id": /[0-9]+/,
		params: {
			parentId: 1 // this param is gonna be added to request with given value; as some default data
		}
	});

	// example2; specific URL pointing to HomeController.actionIndex
	// with optional parameter foo limited with RegExp
	locator.addLocation("locationName2", "Specific-url-what-ever-you-want[/$foo]", {
		"$foo": /[0-9]+/,
		"controller": "Home", // route to this controller
		"action": "index" // and this action
	});

	// Default route - let it last
	locator.addDefaultLocation("[$controller[/$action[/$id]]]");


	/*
	 * URL ALIASES
	 **************************************************************************************************/
	locator.addUrlAlias("/public/favicon.ico", "/favicon.ico"); // URL '/public/favicon.ico' has alias '/favicon.ico'
};
Locations
Just few points you should know about locations (routes).
-
There are variables $controller, $action and
$globlanguage which stands for any controller, any action and locale.
-
$globlanguage stands for locale in URL, if you not place it in location
string
it's gonna be placed at the begining by locator as "$globlanguage/" + location string.
- define your own parameter (slash param) with name starting with $,
- use / (slash) as separator of location's parts (eg. $controller/$action),
-
you can use RegExp to restrict your parameter's value - to option object
add property with key
equals to your param's name, including $, as value set your RegExp,
-
you can set param's default value - to option object add object property
params and add properties (param names) with required default value
- use square brackets to mark something optional.
If need group inside param regex, use not-matching group(?:something).
Controllers
Controllers are some kind of entry points to your application. Controller's methods,
which should be accessible from web, are called actions and must begin with keyword
"action", "get", "post", "put" or "delete".
This words tell framework you want let clients access this method from browser.
Keyword "action" means all requests with all methods. The other words then stands for HTTP methods.
Controllers must be placed in /app/controllers/.
Name convention is PascalCase and name must ends with keyword "Controller".
Controller should be exported ES6 class and all actions must be async.
Default controller name is HomeController and default action name is
actionIndex. Default action or controller name means that those names aren't used
in
URL.
So yourweb.tld/ points to HomeController::actionIndex(). If you use long format URL with default
names
you'll be redirected to short format URL. It prevents duplicate content from occurring.
If some method in framework requires controller or action name, it's its name but without keyword.
Eg. ExampleController's name is Example; actionLogout's name is
logout.
Actions
What actions are is written in paragraphs above. Name convention is lowerCamelCase and name must
starts with keyword "action" or lowercased method name. Actions must be async (ES7).
Action Parameters
All parameters (query params and location's params under defined names) from
requested
URL are injected to actions as parameters under their names in order you define them in action.
Eg. if you request for /articles/delete/5?foo=bar, two params
exist.
First parameter is 5 which is defined in default location as id
and second parameter is bar as foo. These two params will be injected to your action
actionDelete(id, foo) {} to match names you defined. In that action
you wait for id and foo. If these parameters exist in request, action will be called
with that parameters in right order, matched by parameters names.
Returning methods
Returning methods are methods implemented in class Jumbo.Base.Controller and
these methods end requests and return data or errors. See API: Base:
Controller.
Example Controller
Example of controller
/**
 * // TODO: Describe your controller
 * @class ExampleController
 * @memberOf App.Controllers
 */
class ExampleController extends App.Controllers.BaseController {
	/**
	 * Default view action
	 */
	async actionIndex() {
		return "Hello world!";
	}

	async getSomeObject() {
		return { // JSON response
			foo: "bar"
		};
	}

	async getView() {
		return this.view({ optional: "data object" });
	}
}

module.exports = ExampleController;
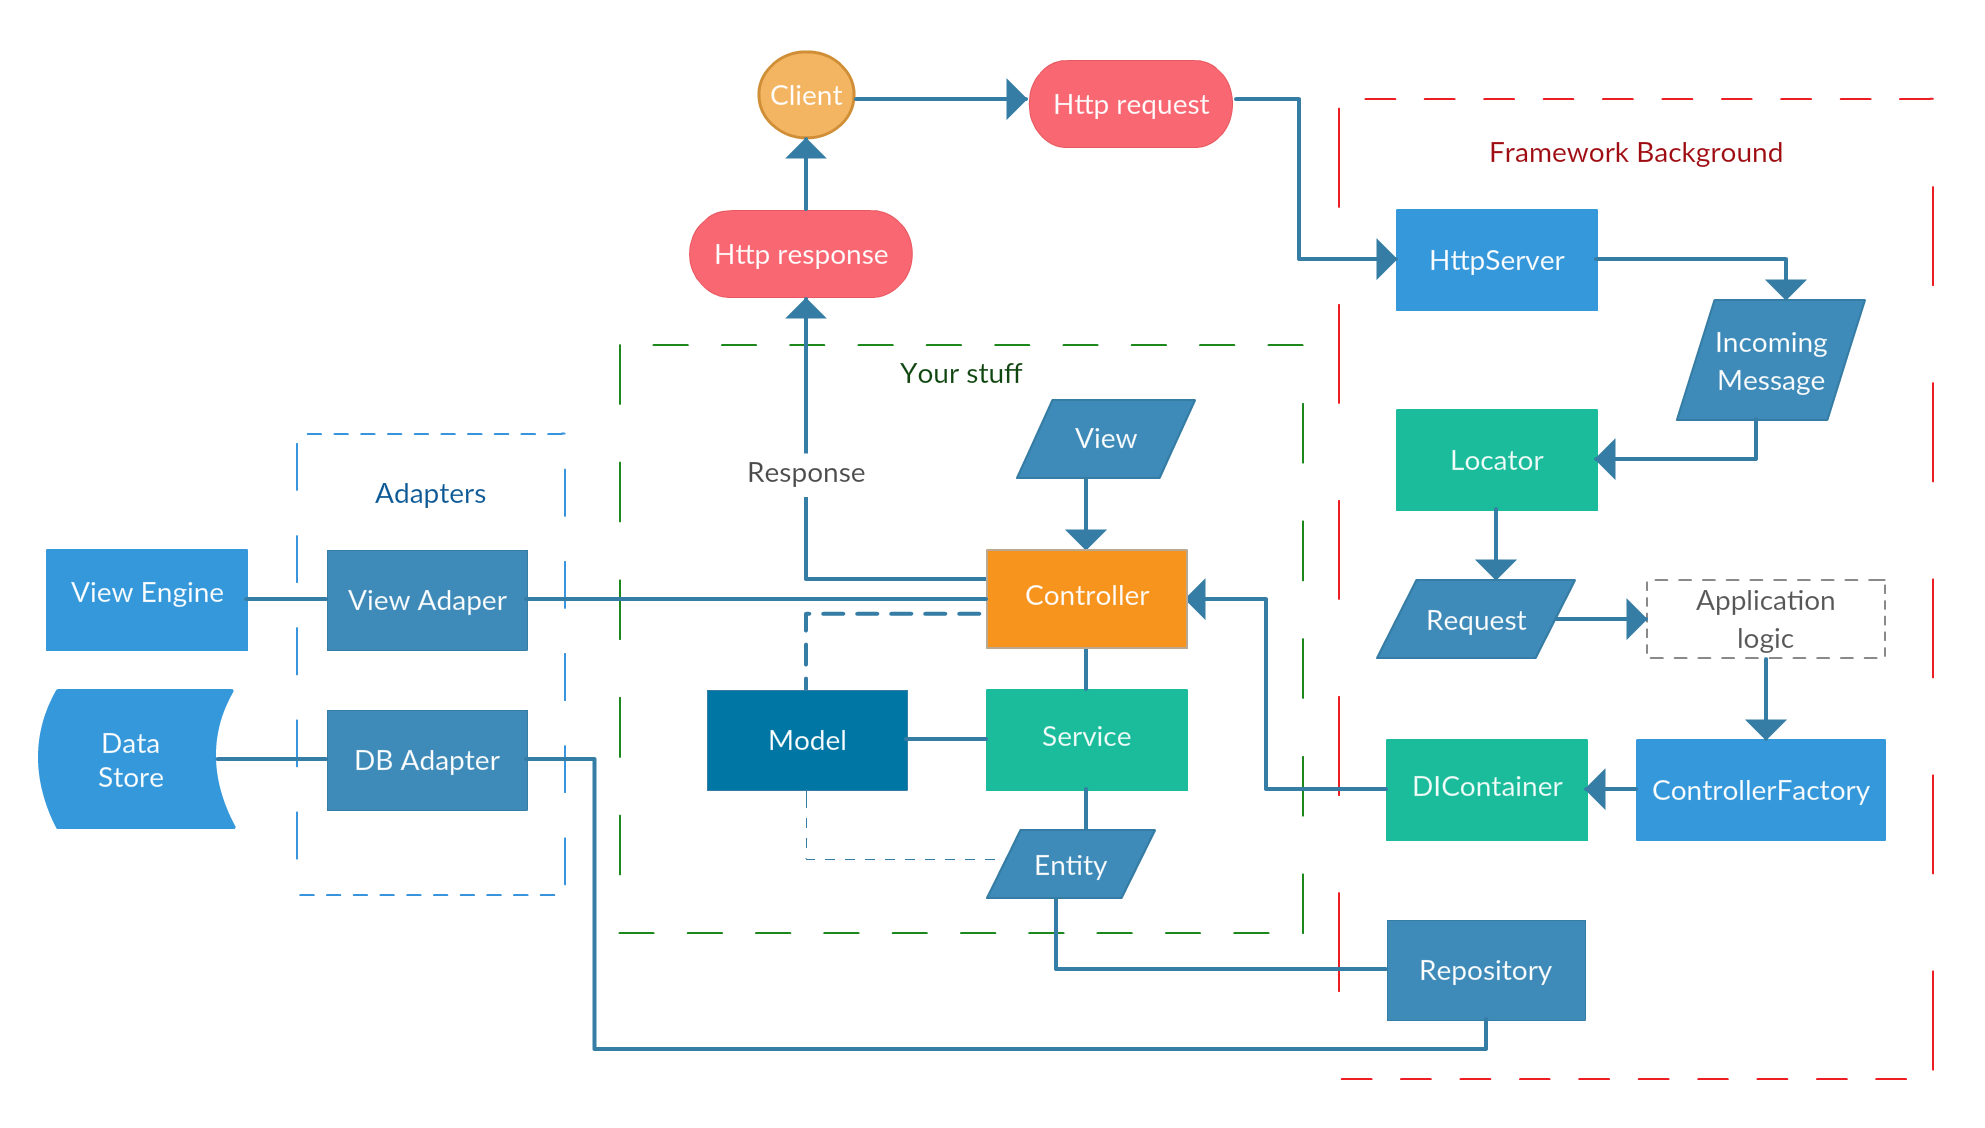
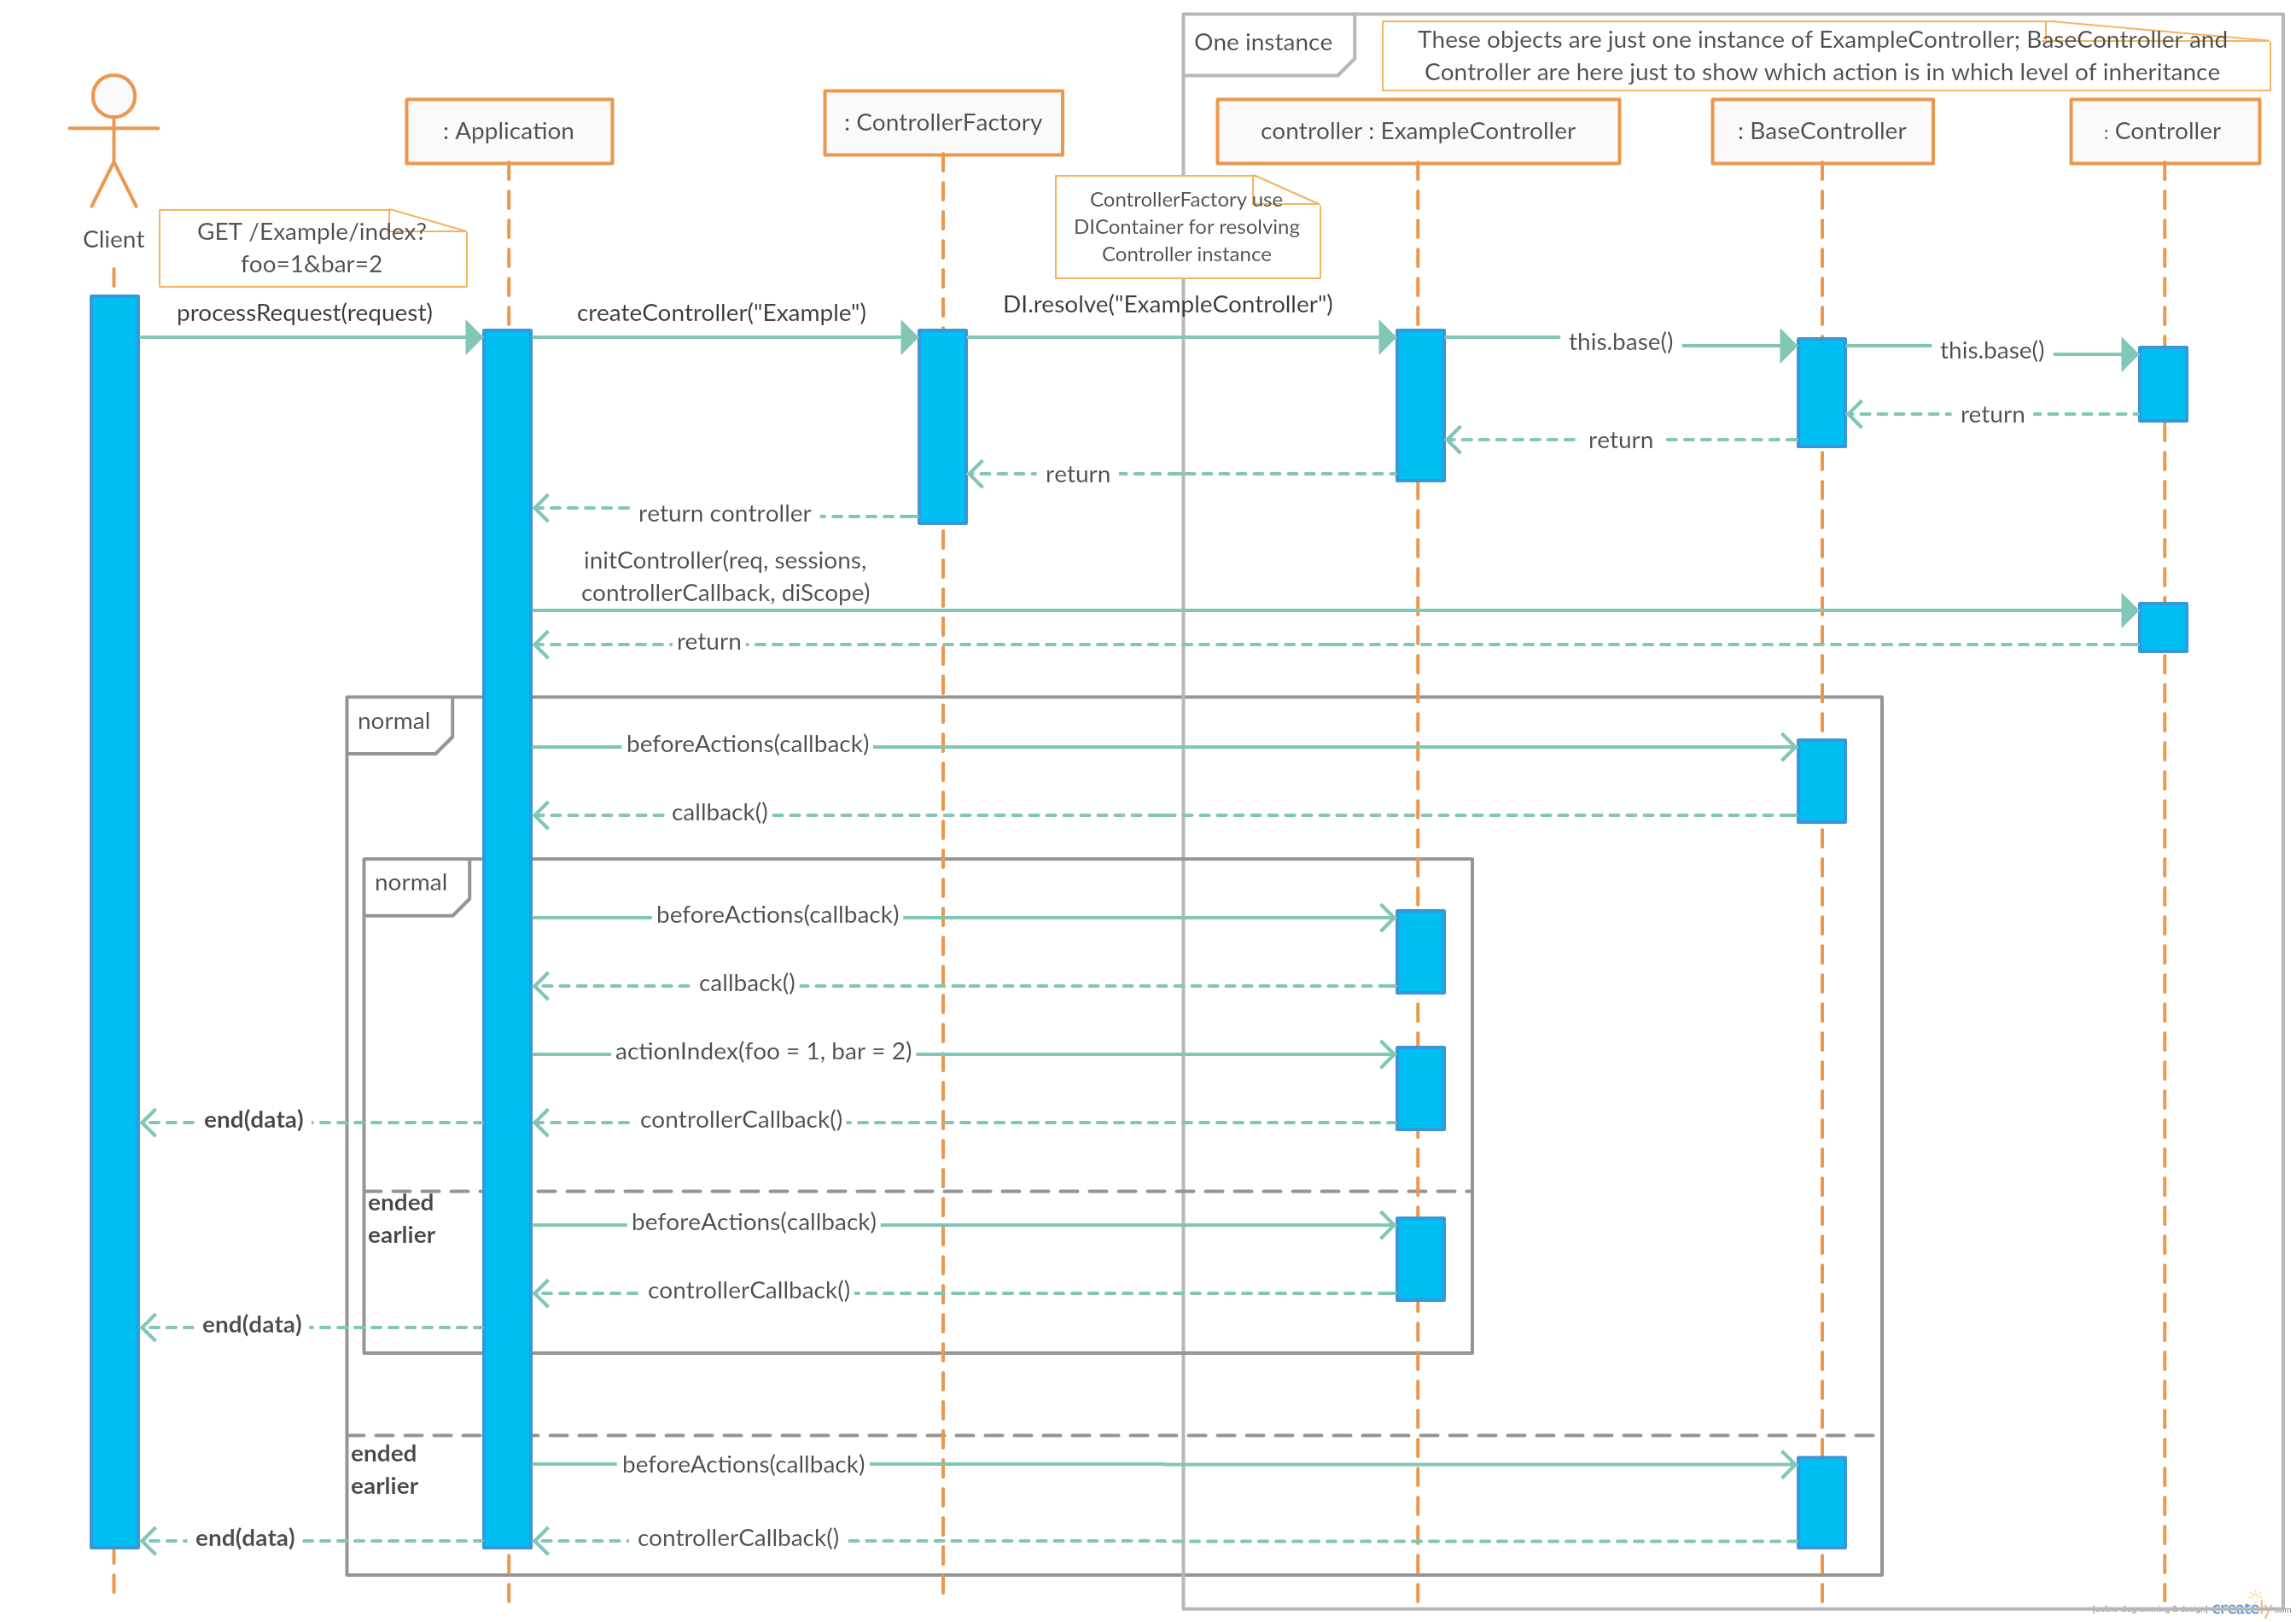
Sequence diagram
There is some sequence diagram which show you how are actions called in controllers.
When request from client comes to server, Application handle that, verify request target and do
some
other stuff.
Then if everything is ok, Application let ControllerFactory create ExampleController instance
for
given request.
When instance of ExampleController is created, internal _initController() method is called and
request, response, session and diScope parameters are set to controller. Request and response
are
not accessible in controller's constructor.
Now it's time for calling action. But first there is beforeActions() method which you can use
to verify user or initialize something or whatever else.
This method can hadle the request and return result if you want, then action is not gonna be
called.
If you not return enything, the corresponding action's gonna be called. This method must be
async too.
Sessions
Session is object in controller instance (property session) which is stored in
memory, that allows you to store instances and sure it's much faster. But it's saved on disk
too,
because server can crash for some reason and maybe you store big data and have low memory on
your
server so disk provides you big storage for your sessions.
Dependency Injection
In JumboJS there is implemented constructor injection which allows
you
to obtain instances of your services in constructors and other classes.
For example you have UserAuthService service
which do some user auth stuff. You want instance of this service in controller so you must create
its instance but UserAuthService need eg. 3 next services or some other class's instances.
Without DI you must create all on your own. With DI, you just register your services and that's all.
You write service name as parameter of constructor and framework resolve its instance for you.
Example codes are just examples.
Example without DI
In this example, you must create instance of each class on your own. If you have 10 controllers,
with same or similar dependencies, you must write more than two hundred lines of code.
ExampleController.js
class ExampleController {
	constructor() {
		this.userAuthService = new App.Services.UserAuthService(
			new UserRepository(
				new Jumbo.Orm.EntityManager(
					new Jumbo.Orm.DBContext(Jumbo.Config.Database.default)
				)
			),
			new UserAccountRepository(
				new Jumbo.Orm.EntityManager(
					new Jumbo.Orm.DBContext(Jumbo.Config.Database.default)
				)
			),
			new SomeThirdNeededService(
				new SomeClass()
			)
		);

		this.someOtherService = new SomeOtherService(
			new EnterpriseRepository(
				new Jumbo.Orm.EntityManager(
					new Jumbo.Orm.DBContext(Jumbo.Config.Database.default)
				)
			),
			new CompanyRepository(
				new Jumbo.Orm.EntityManager(
					new Jumbo.Orm.DBContext(Jumbo.Config.Database.default)
				)
			),
			new SomeThirdNeededService(
				new SomeClass()
			)
		);
	}

	async beforeActions() {
		var user = await this.userAuthService.findUser(this.session.userId);

		if (user == null) {
			this.returnError(null, 403);
			return;
		}

		// Do something with user
	}
}
Example with DI
In this example, you have very simple controller and every other controller will look like
this.
You just register your classes (as services) and dependencies are resolved with framework
automatically and
injected to constructor.
ExampleController.js
class ExampleController {
	constructor(UserAuthService, SomeOtherService) {
		this.userAuthService = UserAuthService;
		this.someOtherService = SomeOtherService;
	}

	async beforeActions() {
		var user = await this.userAuthService.findUser(this.session.userId);

		if (user == null) {
			return this.error("This string is logged message", 403);
		}

		// Do something with user
	}
}
di-registrar.js
/**
 * Dependency registrar - registration of servics
 * @param {Jumbo.Ioc.DIContainer} container
 */
module.exports = function(container) {
	const LifetimeScope = Jumbo.Ioc.DIContainer.LifetimeScope;

	container.register(() => Jumbo.Config.Database.default, "DBConn",
		LifetimeScope.SingleInstance);

	container.register(Jumbo.Orm.DBContext,
		"DBContext", LifetimeScope.SingleInstance);

	container.register(Jumbo.Orm.EntityManager,
		"EntityManager", LifetimeScope.SingleInstance);

	container.register(App.Services.EnterpriseRepository,
		"EnterpriseRepository", LifetimeScope.ScopeInstance);

	container.register(App.Services.CompanyRepository,
		"CompanyRepository", LifetimeScope.ScopeInstance);

	container.register(App.Services.UserAccountRepository,
		"UserAccountRepository", LifetimeScope.ScopeInstance);

	container.register(App.Services.UserAuthService,
		"UserAuthService", LifetimeScope.ScopeInstance);

	container.register(App.Services.SomeThirdNeededService,
		"SomeThirdNeededService", LifetimeScope.ScopeInstance);

	container.register(App.Services.SomeOtherService,
		"SomeOtherService", LifetimeScope.ScopeInstance);
};
If you want to resolve class manually somewhere in code, you can use
Jumbo.Ioc.DIContainer.instance.resolve("UserService")
or this.scope.resolve("UserService") if you
are in controller and you want to resolve your class in controller's Scope.
See API: Ioc.
CLI
JumboJS has special package jumbo-developer which was created to
support
developing. It's console app which helps you with creating projects, controllers and their actions,
services and more.
You can download jumbo-developer via npm
npm install jumbo-developer -g.
It'll be installed as system command so then just type in console
jumbo-developer.
With cmd help you will see list of available commands
API
Jumbo.Adapters
JumboJS is quite modular framework, it integrates many features but almost
everything
can be changed thanks adapters. Adapters are some classes which makes interfaces
over some features.
For example template adapter. It's class which must implements 3 methods (render, preCompile and
renderPreCompiled).
You should use whatever template engine you want but you must create adapter for that engine,
it means that you must implement those 3 methods which returns what framework wants.
Then you just register your adapter in configuration and it's done.
Template Adapter
Template adapter demo
/**
 * Integrated template adapter for Jumplate
 */
var TemplateAdapter = {

	render: async function render(templatePath, layoutPath, dynamicLayout, data, context) {
		return "Basic function. Compile and render view and return complete result.";
	},

	preCompile: async function preCompile(templatePath, layoutPath, dynamicLayout) {
		return "If template engine contains precompilation which can be cached on disk and reused later, return precompiled code.";
	},

	renderPreCompiled: async function renderPreCompiled(compiledTemplate, data, context) {
		return "Process precompiled template and return final render.";
	},

	/**
	 * Extension of template files
	 */
	extension: ".jshtml",

	/**
	 * Tells that you implement preCompile and renderPreCompiled methods
	 */
	preCompilation: true
};

module.exports = TemplateAdapter;
templatePath is path to requested template. layoutPath is path
to layout, can be null. data is object you call view from controller with.
context is instance of controller for given request, you should want some extra data
from controller (eg. current user's language).
Jumbo.Applicationnamespace
Namespace with core classes.
Locatorclass
Locator is some kind of Router which is used to define valid
locations - URLs.
Class synopsis
class Locator {
	static get ParamTypes: RegExp
	static get instance: Locator

    setHost(host);
    setDelimiter(delimiter);
    setMainSubdomain(subName);
    addSubdomain(subName);
    addLocation(locationName, location, [options = null, [subApp = null]]);
    addDefaultLocation(location);
    addUrlAlias(url, alias);
}
setHost(host)
Set server hostname - used for subapp link creation in rare cases when host not known from
request
Params
setDelimiter(delimiter)
Set URL part delimiter spliting parts of url (controller, action etc.)
eg. delimiter "~" => domain.tld/controller~action~id
Params
- delimiter : String String which will separate parts of URL
setMainSubdomain(subName)
Set default subdomain which will route to base app; both urls with and without main
subdomain
will work. It's good for cases when you host application on some subdomain eg.
myapp.domain.tld.
Main subdomain is set to "www" in default.
Params
- subName : String Subdomain name, eg. "www"
addSubdomain(subName)
Register subapp to Locator as subdomain.
Params
- subName : String Name of subapp
addLocation(locationName, location[, options = null[, subApp = null]])
Add new location to Locator.
Params
- locationName : String Name of location
- location : String Location string
- optional options : Object
Location options which should define specific controller or action or can limit
parameters
- optional subApp : String
Name of subapp if you want to use this location only in given subapp
addDefaultLocation(location)
Set default location of Locator.
Params
- location : String Location string
addUrlAlias(url, alias)
Create alias for some url. Eg. you have static file /public/robots.txt and you want this
file
under url /robots.txt so then add url alias addUrlAlias("/public/robots.txt",
"/robots.txt").
Params
- url : String Target URL
- alias : String Alias for target URL
Requestclass
Request is wrap over Node.js's native request.
Class synopsis
class Request {
    request: http.IncomingMessage;
    subApp: string;
    location: ILocation;
    controller: string; // Name of subapp
    controllerFullName: string;
    action: string; // Name of action
    actionFullName: string;
    params: { // URL params
        [key: string]: any;
    };
    body: {{fields: {}, files: {}}};
    noCache: boolean;
    sessionId: string;
    locale: string; // Requested locale
    beginTime: number; // Request begin time
    method: string; // Requested HTTP method

    isXhr();
    getCookies();
    getCookie(name);
	getIP();
}
isXhr()
Returns
Boolean returns true if X-Requested-With == "XMLHttpRequest"
getCookies()
Returns
Object with cookies
getCookie(name)
Params
- name : String Cookie name
Returns
String | null cookie's value
getIP()
Returns
String Client's IP
Responseclass
Response is wrap over Node.js's native response.
Class synopsis
class Response {
	response: http.ServerResponse;
	headers: {
		[headerProp: string]: any;
	};

	setCookie(name, value[, expire[, domain[, path]]]);
	unsetCookie(name);
	redirectURL(url[, code]);
}
setCookie(name, value[, expire[, domain[, path]]])
Params
- name : String Cookie name
- value : String Cookie value
- optional expire : Number Expiration in seconds
- optional domain : String Domain
- optional path : String Path
unsetCookie(name)
Params
- name : String Cookie name
redirectURL(url)
Redirect client to given URL.
Params
Jumbo.Basenamespace
Controllerclass
Controller is base class which you should extend for creating controllers.
Controller implements basic methods which you will need for processing actions.
Class synopsis
class Controller {
	static clientMessagesId: string
	request: Jumbo.Application.Request
	response: Jumbo.Application.Response
	scope: Jumbo.Ioc.Scope
	session: { [key: string]: any; }
	crossRequestData: { [key: string]: any; }
	url: Jumbo.Utils.Url

	addMessage(message[, messageType]);
	exit();
	view([viewOrData[, data]]);
	renderView([viewOrData[, data]]);
	partialView([partialView[, data]]);
	template([view]);
	data(data[, type]);
	json(jsonObj);
	error(message[, statusCode]);
	fileDownload(filePath[, newName[, contentType]]);
	redirect(url);
}
exit()
Completely ends basic workflow. Call it if you processed request/response on your own
view([viewOrData[, data]])
Ends request and return default or given view with given data. This action automatically
handle double-sided rendering header and return required type (view, template, data,
partial)
Params
-
optional viewOrData : String | Object
Name of specific view or just data if view is default (if match with action
name)
- optional data : Object Object with data for view
renderView([viewOrData[, data]])
Ends request and return rendered default or given view with given data.
Params
-
optional viewOrData : String | Object
Name of specific view or just data if view is default (if match with action
name)
- optional data : Object Object with data for view
partialView([partialView[, data]])
Ends request and return partial view without layout.
Params
-
optional partialView : String | Object
Name of spefic view or just data if view is default (if match with action name)
- optional data : Object Object with data for view
template([view])
Return raw template corresponding to view.
Params
-
optional view : String Name of spefic view
addMessage(message[, messageType])
Add message to data for view, allow rendering messaes for clients.
Messages are hold in cookie for next request or to time of first reading.
Params
- message : String Your message for client
-
optional messageType : String
Your custom type which you'll handle while rendering on your own
data(data[, type])
Ends request with result of given data and type
Params
- data : Object Data to be send
- optional type : String Mime type for gven data
json(jsonObj)
Accepts data in Object convert it to JSON and ends request with given data and
application/json
mime type
error(message[, statusCode = 500[, error]])
Ends request with error result. HTML file in /data/errors with given statusCode will be sent
to client. If file not exists, plain text message "We're sorry but some error occurs." will
be shown.
Error object's details will be showed in browser in development mode.
Params
- message : String Message which will be logged, it doesn't display to
client
- optional statusCode : Number default 500
- optional error : Error | Exception Error object which details will be
showed in browser in development mode
fileDownload(filePath[, newName[,
contentType]])
Sends file to client for download
Params
- filePath : String
- optional newName : String
- optional contentType : String
redirect(url)
Send response with location redirect.
Params
- url : Url Instance of Jumbo.Utils.Url which is in controller under this.url
getter
Jumbo.Iocnamespace
DIContainerclass
DIContainer is IoC container which register and resolve your classes.
Class synopsis
class DIContainer {
	static get LifetimeScope: Jumbo.Ioc.DIContainer.LifetimeScope;
	static get instance: Jumbo.Ioc.DIContainer

	register(expr, as);
	resolve(name);
	resolveUnregistered(type);
}
register(expr, as)
Register Type to container under given name as service. If you place that name to
constructor, it'll be matched with this type and injected to that parameter.
Params
- expr : Function Class or arrow function returning class or some object
- as : String Registration name of service
resolve(name)
Resolve dependency which is registered under given name.
Params
- name : String Registration name of Class
Returns
Return instance of registered type
resolveUnregistered(type)
Create instance of given type and resolve it's dependencies.
Params
- type : Function Type which you want to resolve
Returns
Return instance of given type with resolved dependencies
Scopeclass
Scope is IoC scope which resolve your types and returns same instances for
already
resolved types in this scope.
Class synopsis
class Scope {
	resolve(name);
	resolveUnregistered(type);
}
resolve(name)
Resolve dependency which is registered under given name.
Params
- name : String Registration name of Class
Returns
Return instance of registered type
resolveUnregistered(type)
Create instance of given type and resolve it's dependencies.
Params
- type : Function Type which you want to resolve
Returns
Return instance of given type with resolved dependencies
Jumbo.Loggingnamespace
JumboJS contain fully configurable logging with log levels. Messages are logged to
files, each LogType has own file.
Logclass
Log is static class which give you ability log your messages. It accessible from
global variable via Jumbo.Logging.Log.
Class synopsis
class Log {
	static get LogTypes();
	static get LogLevels();
	static level: { Error, Warning, Normal, Talkative }
	static error(message[, type[, level]]);
	static warning(message[, type[, level]]);
	static line(message[, type[, level]]);
}
get LogTypes()
Returns
{ Http, Std }
enum of available LogTypes
get LogLevels()
Returns
{ Error, Warning, Normal, Talkative }
enum of available LogLevels
error(message[, type[, level]])
Params
- message : String Message to log
- optional type : Jumbo.Logging.Log.LogTypes Log type
- optional level : Jumbo.Logging.Log.LogLevels Log level
warning(message[, type[, level]])
Params
- message: String Message to log
- optional type Log type
- optional level Log level
line(message[, type[, level]])
Params
- message Message to log
- optional type Log type
- optional level Log level
Packages
Jumplate
Jumplate is JumboJS's default template engine.
It's one of the fastest (faster than Jade, EJS, Handlebars.js, Underscore) Node.js template
engine with cacheable precompilation. Jumplate is able to compile 16 000 templates in one second
and render 400 000 precompiled templates in one second in one 2,33 Ghz core.
Template code is compiled to native JavaScript (can be cached), then it can be rendered with given
set of data into final HTML.
Variables
All variables begin with $ symbol.
Each variable can be printed as {{$variable}}.
Output has escaped html entities (<, >, &, ", ').
If you want to print variable without escaping use {{!$variable}}.
It's possible to define variable right inside
template with {{var $x = new Date().toString()}}
Comments
Jumplate has block coment which looks like this
{{* Command brackets with asterisks *}}
Block
Define block of code which is rendered in place of definition.
Can be reused with {{include blockName}}.
Block can be included many times.
{{block blockName}}Block content{{/block}}
Define
Define is similar to block, but define will not be rendered in place of definition.
{{define defineBlockName}}Define block content will be rendered here{{/define}}
Defined
Existence of block and definition can be verified with
{{defined defineBlockName}}{{/defined}}.
Include
Include block, define or other template file.
{{include blockName}} will include block with given name.
{{include "./path/to/template.tpl"}} will include file with given path.
Double quotes required.
Cycles
There are two cycles.
{{for $x = 0; $x < $count; $x++}} For content {{/for}}
and
{{for $item of $list}} Foreach content {{/for}}
In case of for..of there is special variable `$itemKey` which is accessible
inside cycle block and contains key of current item.
In both cycles you can use commands
{{first}}Will be rendered if this iteration is first{{/first}}
{{last}}Will be rendered if this iteration is last{{/last}}
{{even}}Will be rendered if this iteration is even{{/even}}
{{odd}}Will be rendered if this iteration is odd{{/odd}}
Conditions
{{if $x == "condition"}}
	if condition true...
{{elseif $x == "else if conditio"}}
	if else if condition true...
{{else}}
	else...
{{/if}}
Localization
You can register localization hadler to Jumplate and
then use command {{loc key.for.requested.translation}}
which will call your handler with given key as parameter.
Jumplate.registerLocalizator(function (key, locale) {
	return SOME_EXAMPLE_MAP[locale][key];
});
Helpers
You can define own helpers, inline and block too. On class Jumplate
there are static methods
Jumplate.registerHelper(name, helper: (...argumets) => string)
and
Jumplate.registerBlockHelper(name, helper: (blockContent: string, ...arguments) => string)
Jumplate.registerHelper("link", function(text, url) {
	return `<a href="${url}">${text}</a>`;
});
Then you can use it in template like this.
{{block menu}}
	{{for $item of $menuItems}}
		{{link($item.text, $item.url)}}
	{{/for}}
{{/block}}
Predefined helpers
In default Jumplate template adapter there are some predefined helpers which should help you with
some stuffs. There will be more helpers soon.
Form
Helper form is block helper which create <form> and </form> around
your code. The begining tag will look like
<form method="POST" action="#" enctype="multipart/form-data">
{{block content}}
	<h1>Registration</h1>
	{{form}}
		<input type="text" name="email">
		<input type="password" name="pass">
		<input type="submit" name="send" value="Sign Up">
	{{/form}}
{/block}
Link
Helper link is inline helper which create url.
link(action[, controller[, params[, locale]]]
{{block menu}}
	{{for $item of $menuItems}}
		{{* Will create eg. /page/nodejs -> PageController.actionNodejs() *}}
		<a href='{{link($item.section, "Page")}}'>{{$item.text}}</a>
	{{/for}}
{{/block}}
Location Link
Helper locationLink is inline helper which create location url.
locationLink(location, action[, controller[, params[, locale]]]
{{block menu}}
	{{for $item of $menuItems}}
		{{* Will create eg. /page/nodejs -> PageController.actionNodejs() by location registered as "default" *}}
		<a href='{{link("default", $item.section, "Page")}}'>{{$item.text}}</a>
	{{/for}}
{{/block}}
Applink
Helper applink is inline helper which create subapp url in same way as
helper link. But here is new parameter at the begining which take sub-app name.
locationLink(subapp, action[, controller[, params[, locale]]]
{{block adminMenu}}
	{{* Will create eg. admin.domain.tld/page/new -> PageController.actionNew() in admin subapp *}}
	<a href='{{applink("admin", "new", "Page")}}'>Create new page</a>
	<a href='{{applink("admin", "list", "User")}}'>List all users</a>
{{/block}}
uJumbo
uJumbo is client part of JumboJS.
This micro-framework allows you to automate client side SPA creation.
You just create uJumbo.Controller, give it content selector and that's all, your web is now SPA.
See uJumbo Repository
Example Controller
(function(scope) {
	if (scope.AppController) return;

	var AppController = scope.AppController = class extends uJumbo.Controller {
		constructor() {
			super("body"); // Context selector
		}

		onInit() {
			console.log("Called on app init", arguments);
		}

		onBeforeNavigate(headers) {
			console.log("Called before navigatin", arguments)
			// return false; -> as prevent default
		}

		onNavigate(error, response) {
			if (error) {
				console.error(error);
				alert(error.message);
			}

			console.log("Called after navigation", arguments)
		}

		onPopState(state) {
			console.log("Called on browser BACK", arguments)
		}

		onBeforeFormSubmit(data, headers) {
			console.log("Called before form submit", arguments)
			// return false; -> as prevent default
		}

		onFormSubmit(error, response) {
			if (error) {
				alert(error.message);
			}

			console.log("Called after form response received", arguments)
		}

		myAction(hello) {
			alert(hello);
		}
	};

	scope.appCtrl = new AppController();
})(window);
As you can see, there are some on[Something] methods in the controller. That's optional handlers.
There is method myAction too. It's yours defined method, which can be called from
controller itself or from view by data-j-on events.
View Example
<form>
	<button data-j-onClick="myAction('Hello World')">Say Hello.</button>
</form>
UniMapperJS
UniMapperJS is JumboJS's default ORM.
This ORM is based on Entity Framework from .NET. For queries you use JS functions and expressions
same as you do with Array. See UniMapperJS.
Example query
// Students their name starts with 'P' or ends with 's'
let startsWith = "P";
let students = await Student.getAll()
	.filter(s => s.name.startsWith($) || s.name.endsWith("s"), startsWith)
	.sort(s => s.name)
	.slice(3, 8) // limit 5, skip 3
	.map(s => ({
		id: s.id,
		name: s.name
	}))
	.exec();